Solar-Electric Power Generation
at Home and at Hayama Retreat - Experimental
(To view the images in each page, click the underlined phrases,
and to return to this page,
click RETURN key on the toolbar of your browser
- Home at Kohinata, Bunkyo-ku, Tokyo -
2013. 3.26 - 4.6. I installed small-scale solar-electric power generation system at home in Bunkyoku, Tokyo, Japan. Block diagram is
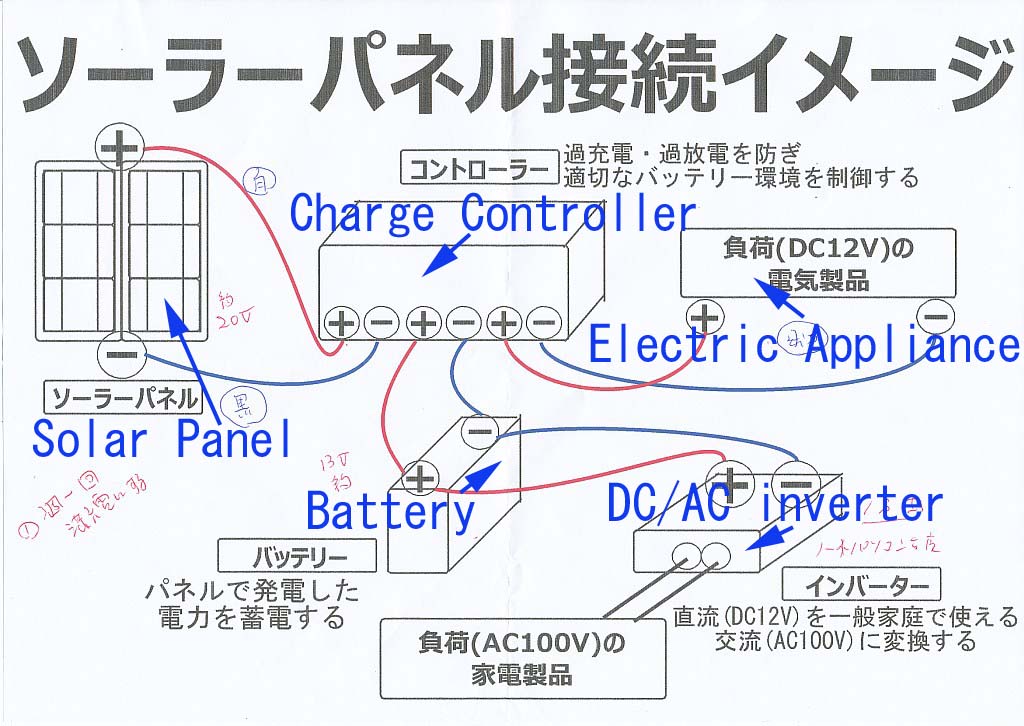
Block Diagram (Crick to enlarge).
I did not install DC/AC inverter which can drive, say, notebook PC, or get smartphone recharged.
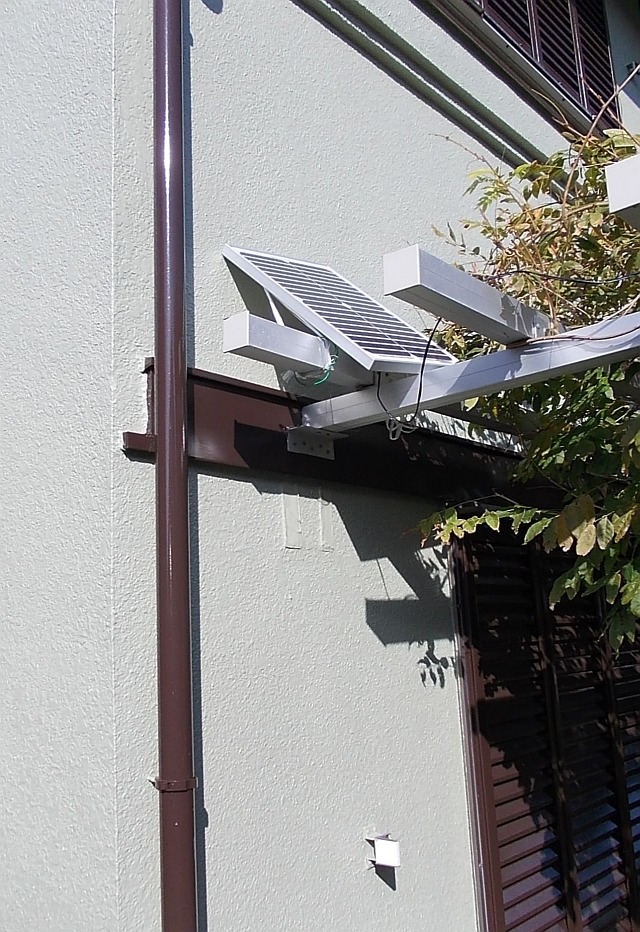
Parts are all purchased at specialized store in Akihabara district, Tokyo, Japan, whose list with prices and advertized performances is available (list). Initial investment was modest 13,000 Yen. I implemented this system to the laundry pole facing the anterior lawn garden. This first generation system uses Landstar LS0512R as a solar light controller.

I implemented this system to the laundry pole facing the anterior lawn garden.

On the dorsal side of the solar panel, label indicates performamce data.
Question No.1: Is this solar panel working as a unit?
I check charging voltage on a sunny day with Yokogawa Electric's circuit tester (April 7 2013).
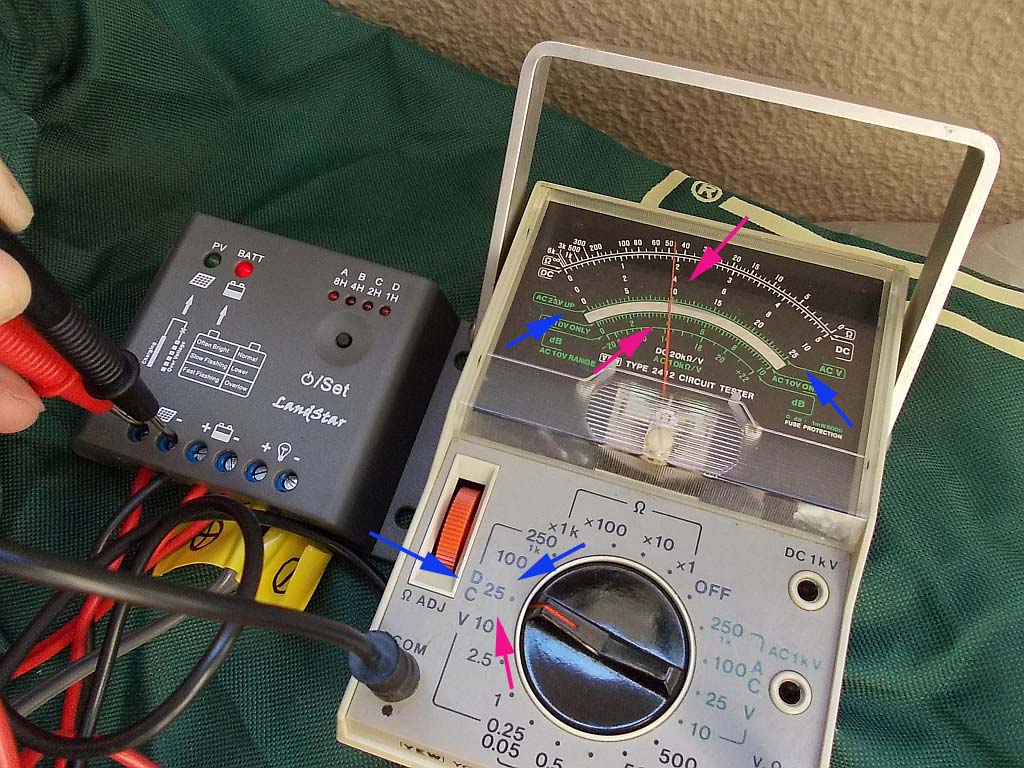
DC 10V indicated by Yokogawa Electric's circuit tester (Crick to enlarge)
At this moment, I noticed that the solar panel is not maximally exposed to sun shine. So I drew forth the panel more to the garden side.
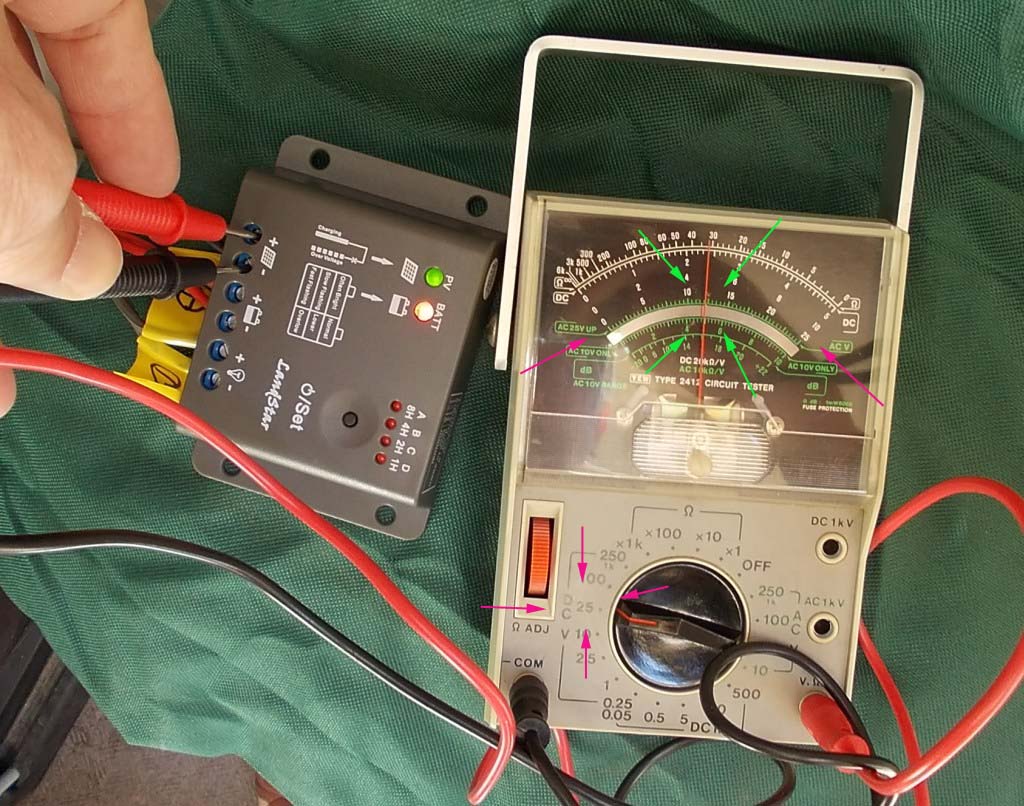
DC 12V indicated by Yokogawa Electric's circuit tester (Crick to enlarge)
After repositioning of the solar panel (see below)

Actually, because of setting limitation from balcony of the condo, the whole area of the solar panel is not fully utilized yet
(
Panel area indicated by red arrows with limited utilization efficiency, Crick to enlarge)
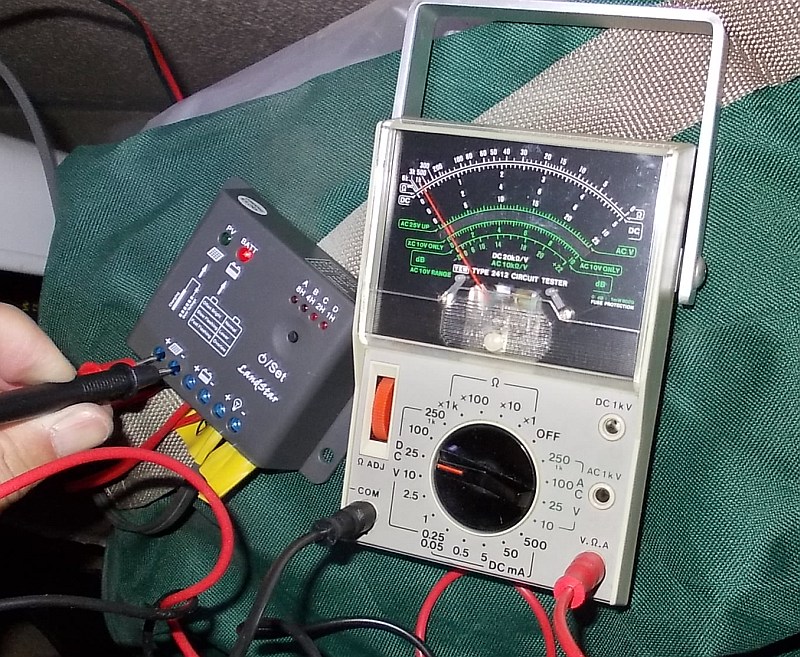
DC near 0V indicated by Yokogawa Electric's circuit tester (Crick to enlarge)
after sunset
Provisional judgment regarding Question No.1: The measurement of voltage of interconnects from the solar panel reflects charging voltage of this solar panel. And this cheap solar panel is working, to a greater or lesser extent.

Timer is being set "On for 1 hour after 10 minutes delay after sunset", and it is working.
Technically, solar electric generation is not so easy to let it enduring for a long time. Firstly, for battery not to run out (frequent running-out results in decrease in endurance of expensive battery), electric generation and consumption must be well balanced. Sun is not always shining, especially in Japan (this is not Arizona or Spain!). So, I will test this system step-by-step, i.e. "On time" from 1 hour after sunset, then to 2 hours, 4 hours and 8 hours, consulting battery status indicator of charge controller which shows normal/under voltage/over discharged. Future option is (1) increase of number of solar panel, (2) installation of more robust battery,,,, I hope this experiment will combine fun [pleasure] and profit, and teach me more about the reality of solar electric generation (not fantastic story, you know).
Question No.2: Is this solar panel effectively recharging the battery as a system unit?
According to nominal performance in the manual, this charging controller (Landstar LS0512R) disconnect at 11.1V and reconnect at voltage 12.6V. My thought is, probably this controller disconnects after sunset, when the charging voltage is decreasing, at 11.1V, and reconnects and begins to recharge the battery after dawn at 12.6V, when charging voltage from the panel is increasing from near zero. In this context, I suspect there is threshold voltage to start recharging the battery. If the current setting of the solar panel, e.g., efficient directly exposed area to the sun, entry angle of the sun light to the panel with seasonal variation, etc, cannot clear the reconnect voltage, this system will go purely depending on the battery without recharging by the solar electric power generation. It is certainly a possibility. In that case, 10Ah/12V battery probably has a capacity of 120W x hour. Since the output is 3W spot light, it will continue to work 120/3 = 40 hours without solar light recharging? It must be verified if this solar panel is effectively recharging. Very interesting.
2013. 4.9. I append one more solar panel of the same size. After I bring home the newly-purchased one at Akihabara (2.4 kg, +4,600 Yen), I check the charging voltage of the new one with tester in stand-alone status before installing it to the system.


The tester indicates DC 15V in dusk
O.K. no problem. At the same time, I add LED digital battery meter (voltmeter) to the battery terminals in order to health check the battery status without using tester.

DC 12.9V showed by the indicator (Camera flashlight blanks out LED reading)
I install the new panel to the system in parallel charging circuit by applying solder.

Now, timer is being re-set "On for 4 hour after 10 minutes delay after sunset"
2013. 4.11. For the last 2 days, I have checked fluctuation of the voltage of the battery with LED digital meter.
Chronological change of voltage April 9 at 19:00PM: 12.9V --(4-hour lighting)-- at 10:45PM: 12.7V --(overnight)-- April 10 at 7:00AM (a few hours of charging after sunrise): 12.9V --(daytime charging, 4-hour lighting)-- April 10 at 11:00PM:12.8V --(overnight)-- April 11 at 7:00AM (a few hours of charging after sunrise): 13.1V --(daytime charging, 2-hour lighting)-- April 11 at 19:30PM 13.0V
Now, timer is being re-set "On for 8 hour after 10 minutes delay after sunset"
2013. 4.16. Chronological change of voltage April 11 at 7:30PM 13.0V --(lighting)-- April 11 at 8:30PM: 12.7V --(lighting)-- April 12 at 7:00AM 12.7V --(daytime charging, cloudy day)-- April 12 at 6:00PM 13.1V ---(Hayama retreat)--- April 14 at 5:00PM 13.1V --(lighting)-- at 9:30PM 12.5V -- at 11.15PM 12.4V --(8-hour lighting)-- April 15 at 7:00AM 12.4V --(daytime charging)-- at 7:20PM 12.6V --(lighting)-- 10:00PM 12.4V --(8-hour lighting continued)-- April 16 at 6:30 12.3V --(daytime charging, almost sunny day)-- at 7:30PM 12.6V -- at 9:00PM 12.4V

Chronological change of voltage of the battery with LED digital meter
2013. 4.23. After the timer was re-set to "On for 8 jours" the mean voltage of the battery has been gradually lowered, and on April 21 the battery status Red LED of the charge controller began SLOWLY FLASHING, which warns "Under voltage" (If Over Discharged, the Red LED would be FAST FLASHING according to this manual). As a result, I had no other choice but to disconnect the output (lighting schedule is totally off) and to charge the battery till acceptable level. In this morning, the sun is shining after quite an absence, and the voltage level seems recovering. Charging force is remarkably different between on full sunny day and cloudy day. After moderate recovery of battery voltage, timer is re-set to "On for 1 hour" at 18:30.

I installed the second LED digital battery meter (voltmeter) to the charging line from the solar panel.

2013. 4.29. After 8-hour lighting regiment under persisting cloudy and rainy days (dark green line), I was forced to disconnect the output circuit (red line). This weekend the sky is clear and the sun is shining. As a result the battery voltage is remarkably recovered. Timer is being re-set "On for 4 hour after 10 minutes delay after sunset" again.
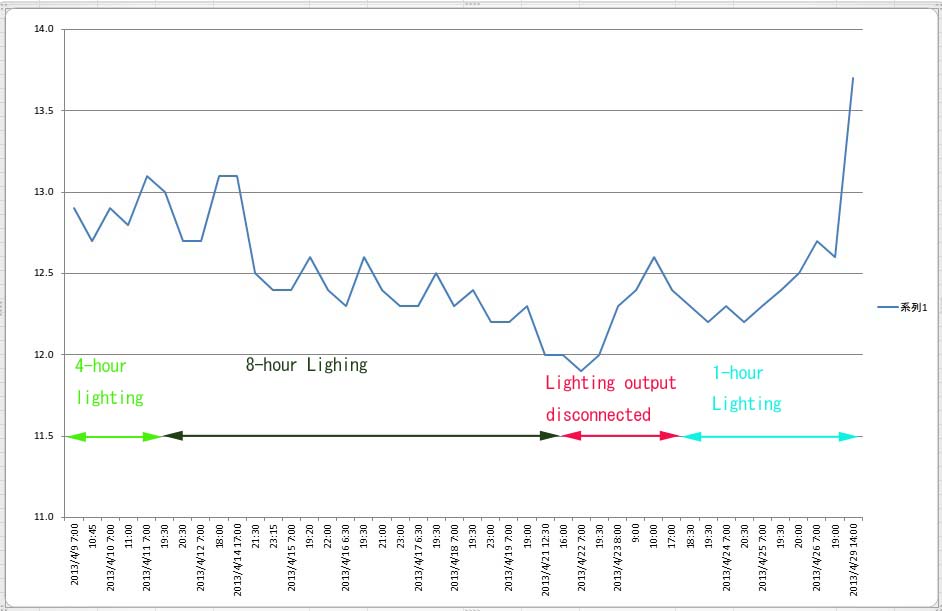
Battery voltage significantly recovered with shining sun (Crick to enlarge)
in this weekend

LED digital battery meter (voltmeter) of solar panel-side circuit at 15:00 under clear sky and shining sun

LED digital battery meter (voltmeter) of battery at 15:00 at the same time as the above image
2013. 9.29. Today the battery voltmeter indicates 13.6V and the solar panel meter 16.8V at 16:00, so timer is being re-set "On for 6 hour after 10 minutes delay after sunset".
2014. 9.23. The system is working with no problem.
2014.11.16. I added one more battery, which had been uncoupled from the Hayama system on September 22 2014, eventually to charge parallelly the two batteries (Long Deep Cycle Battery 12V10Ah).
2017.12.30. Because the original solar charge controller is malfunctioning lately, it is changed to the other el cheapo Chinese controller PWM EPRC10-EC (2,500 Japanese Yen) - Photo-1 and Photo-2.
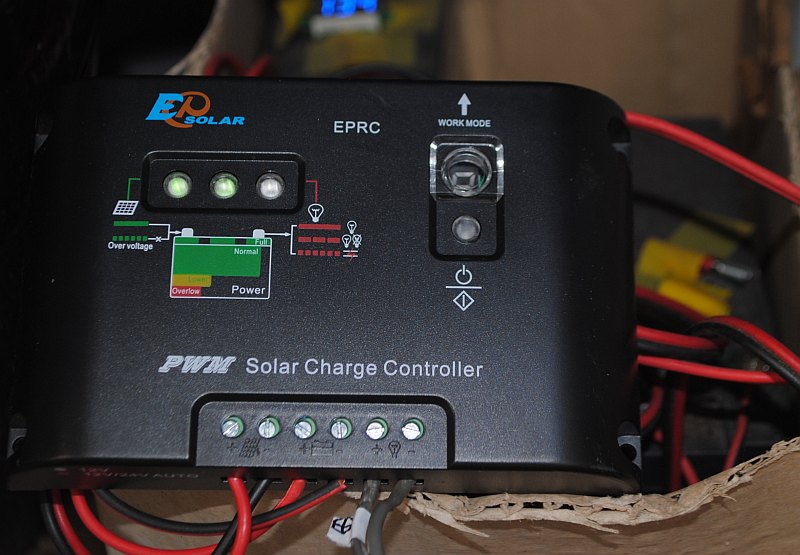
New solar charge controller (Crick to enlarge)
2018.1.2. Aging lighting lump (LED, right) is replaced with the new one (left) - Photo-1.
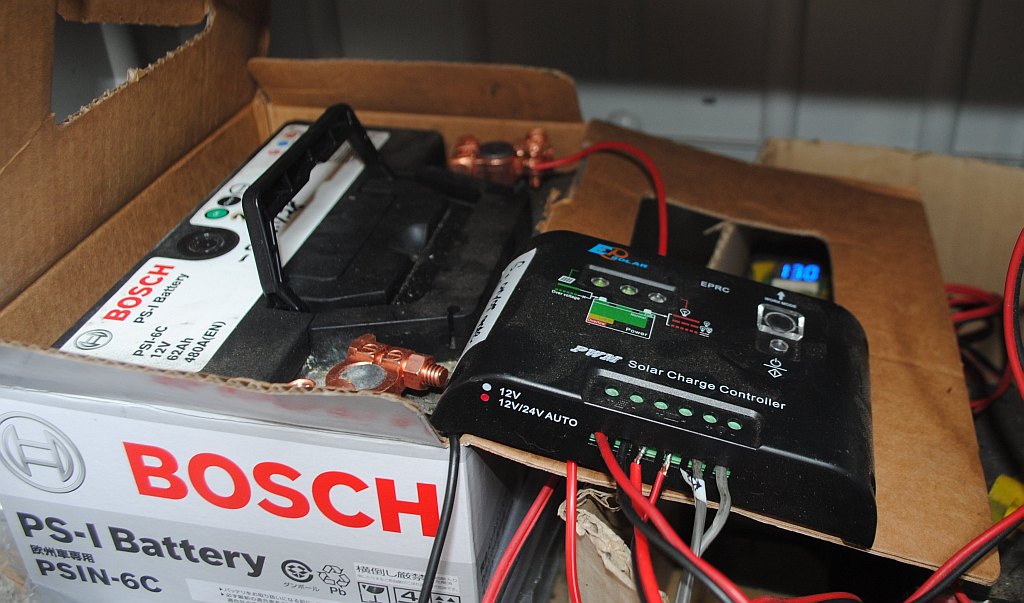
2018.8.6. I replaced the battery of Solar-Electric Power Generation at Kohinata with retired BOSCH battery (PSI-6C) which is over eleven years use on Saab S900s (1996 model) but still alive - Photo-1 Charge is made from two solar panels to the controller (middle right black box) to the left BOSCH battery (PSI-6C), - Photo-2 This time battery terminals (gold) are purchased on-line shopping at 419 Yen x 2 at MonotaRO shop.
Battery replaced to Bosch used one (Crick to enlarge)
2018.8.11. I reinstalled the till-lately incumbent two batteries, which have been disconnected temporarily for installment of Bosch battery. Now three batteries are working - Photo-1. At the same time, I installed voltmeter at the stem, in addition to the former one at the old two batteries. Be careful: when disconnecting battery, minus terminal (-) first, and when connecting, plus (+) terminal first!
2020.5.11. This system remains to be out of order for a shot period lately. I disconnect the old two Lond Deep Cycle Battery 12V10Ah (purchased in March and September 2013), and confirm that the system restored. For some time, I maitain this system only with a single Bosch battery (PSI-6C from Saab S900s, 1996 model). Separately measured, each Lond Deep battery still indicates over 10V.
2020.6.1. The cause of current malfunction is revealed exhaused battery (Long Deep Cycle WP10-12SE since 2013.3 and Bosch PSI-6C since 2006.12., both are burnt out) . I try one more car battery (Shin-Kobe Electric Machinery, originally installed to Birkin 7 on September 20 2014), which is recently retired - Photo-1.
2025.7.3. The aged battery is changed to the newly retired battery G & Yu brand (half a year use since 2024. Nov) from Birkin 7 operated in Hayama Retreat
- Photo-1.
- Photo-2.
- Retreat at Hayama, Miura Peninsula -
2013. 9.21 - 9.22. After stable system is successfully installed in Kohinata, I set up the same system again at Hayama retreat. Lighting lump (LED) is installed on the top of greenhouse here.

Solar panel (34.5x48.4x2.5 cm in dimension, 2 kg) is installed under the top of the greenhouse. Certainly, because of reflection by the top glass (roof) some degree, the yield efficiency of solar radiation energy may not be ideal, but this is my compromise in the current situation.

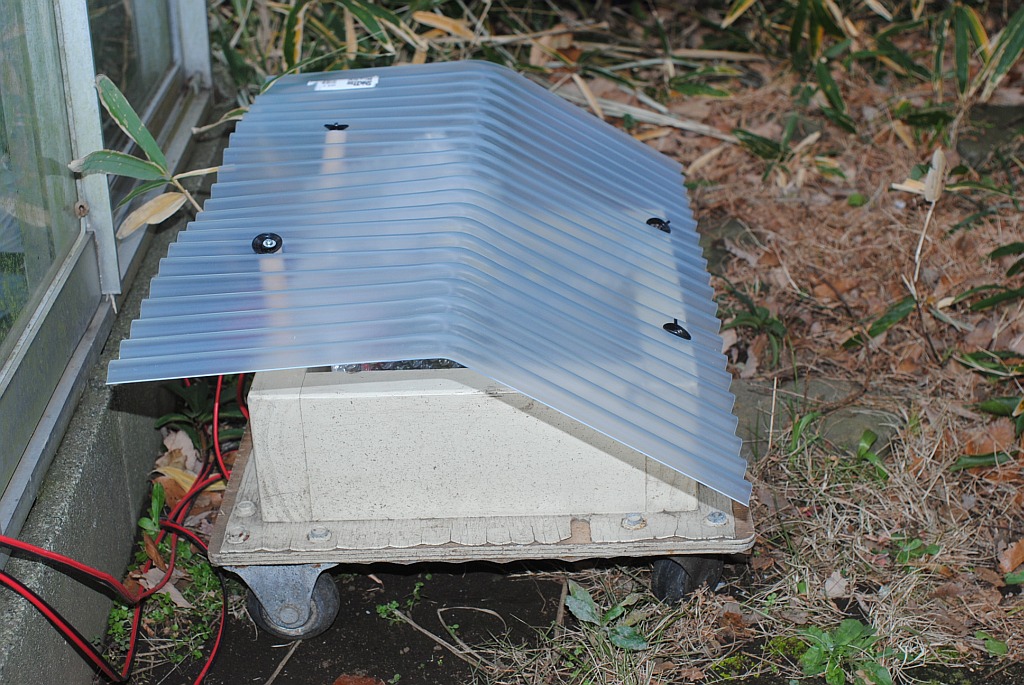
Charge controller is PWM 201, and controller and battery is installed to a small wooden box (caster) outside of the greenhouse, because high temperature in the greenhouse would injure the battery and controller. Ill-effect is long wiring, which may lose some electricity because of resistance. A small compact (and cheap) voltmeter is connected to the battery to monitor the voltage (to avoid over-consumption of the battery in order to elongate its endurance). Overnight, receiving the energy from the sun in the morning today, the meter indicates 12.8V, no problem. Long wiring is apparently not so problematic, so far.

After the sunset, the controller starts the LED lump - Photo-1, and actually I set up conservativly "for 2 hours after the sunset". With White Horse on the rock with Coleman's armchair. It is difficult to shoot a real image of this situation ;)
In the next morning, housing caster for battery and controller/CPU is finished after water-proof painting for the roof.

Ditto. water-proof painting for plywood roof. I assembled this temporary housing with things I have on hand.
2013.9.28. After 2-hour lighting finishes at night, the battery voltmeter indicates 12.1V and in the next noon 12.3V. Not bad, keep going.
2013.10.12-10.14. The second panel is added. Firstly it was set mobile using extension cable - Photo-1, Photo-2 (First panel is fixed at the roof of the glasshouse -red arrows- and second panel is mobile with extension cable -yellow arrows-). After searching for sweet spot/angle, the second panel is now fixed using concrete block - Photo-3, Photo-4.
2013.11.24. As the culmination altitude of the sun decreases to the winter season, the charging efficiency declines accordingly, and the voltage of the battery came down to 11.2 V this weekend. So I redeploy the second panel upward onto the wisteria trellis - Photo-1, Photo-2. Now, even the culmination is low, the panel receives photon pretty efficiently. The voltage returns to 12.5 V in the early afternoon.
2014.1.02. The roof of the small wooden caster for storage of the battery and charge controller is replaced with vinyl-chloride corrugated panel, purchased at 390Yen at the home center. The previous plywood roof was not water-resistent even after painting, and was decaying.
2014.9.22. I replaced the currently working battery (Long Deep Cycle Battery 12V10Ah), which was purchsed at the specialized shop at Akihabara circa a year ago, with dismounted car battery 40B19L from Birkin 7 after circa 4-year use - Photo-1. I suppose that the large car battery has more capacity for this kind of use, however, I don't have hard evidence or scientific data to support that hypothesis. So, I try. Otherwise, the system is working with no problem.
As of till 2023, as the small wooden caster has been broken due to aging, the system has been moved into the glass house.
DISCLAIMER: The views expressed here are those of the author Akio Hasegawa and do not reflect the official policy of any institutions in Japan. I have no finantial interests regarding this project. Citations of trade names do not constitute an endorsement of the products. Feedback is, as always, encouraged.
Please send your comments to akio-h@fg-khn.jp
Back to previous Home Page at AOL (Till October 31 2008)
Back to previous Home Page at geocities.jp web host (Till March 31 2019)
Back to New Home Page (Translocated Sakura server)
Version 1.10 2023.9.19.